Crafting with lavender is a great way to celebrate this herb in both its fresh and dried forms.
Ideas for Crafting with Lavender
After one year inside the home, exposed to sunlight, the color will begin to fade, but the oils will still be fragrant. Turn your one year old lavender bundles into sachet by rolling the bundle of flower heads between your hands to remove the buds from the stalk. sift the sachet through a sieve and pick out the stems. Tie this sachet into a vintage handkerchief for the next year to add fragrance and a moth repellant to your drawers.
Creating Your Own Lavender Sachets
To create your own sachet, rub the heads of dried bundles between your hands, collecting the blossoms on a clean surface. Sift the brown flower bracts out of the mixture leaving only the purple fragrant buds. Depending on the variety, some lavender falls off the stem soon after it is dried (eg: Sachet, Provence) and others stay on the stem better and are good to use for dried bouquets (eg: Lodden Blue, Royal Velvet, Grosso, Hidcote Giant).
Making Lavender Wands
Materials: 13 or more fresh stems of lavender (any odd number greater than 13)- each at least 12 inches tall.3 yards of satin or other ribbon, 1/4 inches wide. Patience… allow yourself about 40 minutes to do your first wand. Be very forgiving of yourself… like all skills, this one improves with practice.
Strip all the leaves from the stem. The suppleness of the stem is important to the success of wand making. Harvest the lavender early in the day, and make sure that the flowers are not damp.
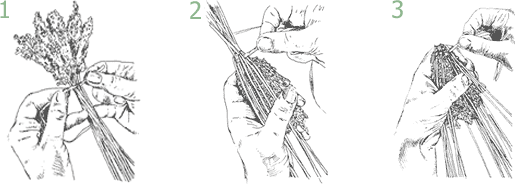
Line up the bottom of the flower heads and tie them gently together with the end of the 3 yards of ribbon. See picture 1.
Turn the bundle upside down and gently bend each stem down around the blossom heads. You can facilitate this step by scoring the underside of the stem section that is being bent with your fingernail. When all of the blossoms are “in a cage of stems” the long end of the ribbon should be pulled out of the cage, the short end tucked inside.
Line up all of the stems evenly around the blossoms, making sure that they do not overlap. See picture 2.
Start to weave the ribbon under and over the stems. Gently pull on the ribbon to make sure the weave is tight. The most difficult part of this process is in the first two rows of the weaving. On the second row you should be going under the stems that you had gone over on the first row. See picture 3.
Continue weaving until you have covered all the flowers. You can use a stem of lavender to push any buds that stick out back into the weave or rub them off. Wrap the ribbon around the “neck” of the wand and tie a slip knot.
Trim the stems to the same length and continue to wrap the stems until you reach the end. Use a rubber band to secure the ribbon to the end of the stem. After the stem has dried and shrunk, you can rewrap the ribbon and glue the ends.

Learn more about lavender:
Facts & History | Lavender Varieties | Wholesale Lavender | Drying Lavender
Cooking & Recipes | Lavender Crafts | Growing Lavender | Books & Links